Spring Security
- 웹 사이트는 다양한 리소스와 유저들의 개인 정보를 가지고 있다. 이런 리소스를 보호하기 위해 일반적으로 웹 사이트는 두 가지 보안 정책을 설정해야 한다.
- 서버 리소스
- 유저들의 개인정보
- 이러한 보안 정책을 Support해주는 것이 Spring Security이다.
- Spring Security는 인증, 권한 확인을 위한 코드 작성을 쉽게 도와준다.
인증(Authentication)
- 사이트에 접근하는 사람이 누구인지 알기위함 (Login)
- IdPassword인증
- Session관리
- 토큰 관리(sessionless)
- Sns로그인 : 인증 위임
권한(Authorization)
- 사용자가 어떤 일을 할 수 있는지를 구분하기 위해 필요
User생성하기
- dependency에 Security를 추가해주면 자동적으로 security가 동작한다.
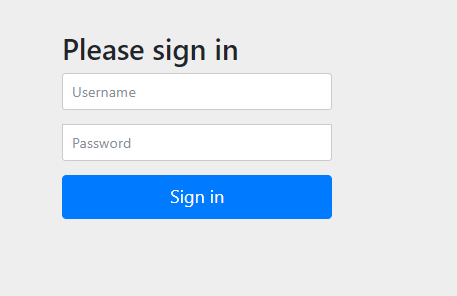
home controller를 생성한 뒤 서버를 열어보면 아래의 사진처럼 로그인을 요구한다.
![security]()
- default id는 user이며 password는 서버 console에 나와있다.
application.yaml을 통해 유저를 생성할 수 있다.
단 application.yaml로 설정할 수 있는 user는 한명 뿐이다.
1
2
3
4
5
6
  spring:
    security:
      user:
        name: user1
        password: 1111
        roles: USER
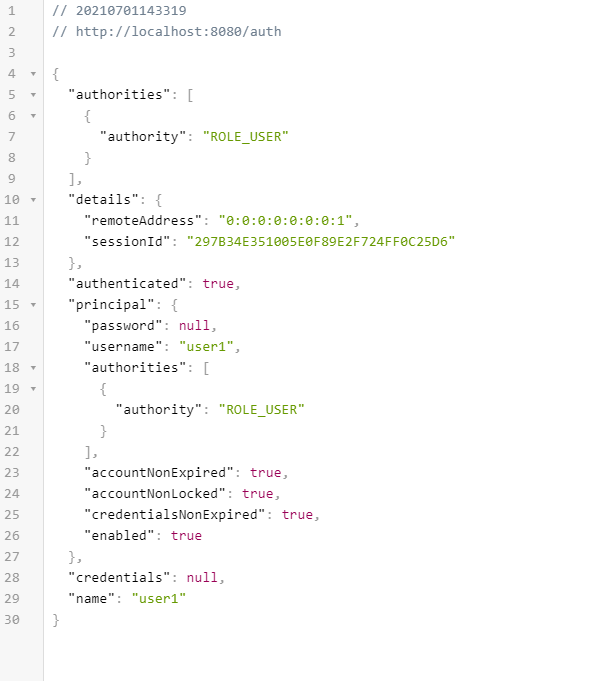
인증 정보 확인하기
1
2
3
4
5
6
7
8
9
10
11
12
13
@RestController
public class HomeCotroller {

    @RequestMapping("/")
    public String index(){
        return "homePage";
    }

    @RequestMapping("/auth")
    public Authentication auth(){
        return SecurityContextHolder.getContext().getAuthentication();
    }
}
1
2
3
4
5
6
7
8
9
10
11
12
13
14
15
16
17
18
19
20
21
22
23
24
25
@RestController
public class HomeCotroller {

    @RequestMapping("/")
    public String index(){
        return "homePage";
    }

    @RequestMapping("/auth")
    public Authentication auth(){
        return SecurityContextHolder.getContext().getAuthentication();
    }

    @PreAuthorize("hasAnyAuthority('ROLE_USER')")
    @RequestMapping("/user")
    public String user(){
        return "ROLE USER";
    }

    @PreAuthorize("hasAnyAuthority('ROLE_ADMIN')")
    @RequestMapping("/admin")
    public SecurityMessage admin(){
        return "ROLE ADMIN";
    }
}
- PreAuthorize를 통해 권한을 설정할 수 있다.
- 추가적으로 권한 체크 모듈을 작동 시켜야한다.
1
2
3
4
5
6
7
8
9
10
11
12
13
14
15
16
17
18
19
20
21
22
@EnableWebSecurity
@EnableGlobalMethodSecurity(prePostEnabled = true) // prePost로 권한 체크
public class SecurityConfig extends WebSecurityConfigurerAdapter {

    @Override
    protected void configure(AuthenticationManagerBuilder auth) throws Exception {
        auth.inMemoryAuthentication()
                .withUser(User.builder()
                    .username("user2")
                    .password(passwordEncoder().encode("2222"))
                    .roles("USER"))
                .withUser(User.builder()
                    .username("admin")
                    .password(passwordEncoder().encode("3333"))
                    .roles("ADMIN"));
    }

    @Bean
    PasswordEncoder passwordEncoder(){
        return new BCryptPasswordEncoder();
    }
}
- WebSecurityConfigurerAdapter에서 유저를 추가하면 Application에서 추가한 user는 무시된다. 또한 password를 encode해주지 않으면 error가 발생한다.
인증없이 통과
Spring security는 모든 요청에 인증을 요구한다.
1
2
3
4
5
6
7
  protected void configure(HttpSecurity http) throws Exception {
          http.authorizeHttpRequests((requests) ->
                  requests.anyRequest().authenticated());
          http.formLogin();
          http.httpBasic();
      }
  }
- 모든 request에 대해서 인증 받은 상태에서 접근을 허용하도록 설정이 되어 있기 때문이다.
특정 path에 대해 인증없이 접근을 허용하고 싶다면 아래와 같이 작성해주면 된다.
1
2
3
4
5
6
7
8
9
10
11
12
13
14
15
  @EnableWebSecurity
  @EnableGlobalMethodSecurity(prePostEnabled = true)
  public class SecurityConfig extends WebSecurityConfigurerAdapter {

      ...

      @Override
      protected void configure(HttpSecurity http) throws Exception {
          http.authorizeHttpRequests((requests) ->
                  requests.antMatchers("/").permitAll()
                          .anyRequest().authenticated());
          http.formLogin();
          http.httpBasic();
      }
  }
antMatchers(“/”)로 “/”의 접속은 permitAll을 통해 인증없이 허용