Deep Learning Basic
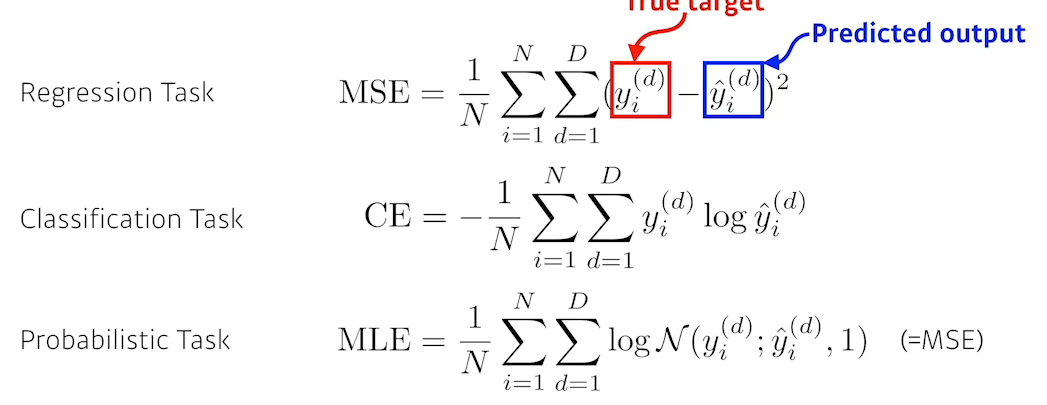
loss function

pytorch
- numpy구조를 가지는 Tensor객체로 Array를 표현한다.
- 자동미분을 지원하여 DL연산을 지원한다.
- 다양한 형태의 DL을 지원하는 함수와 모델을 지원한다.
실습
- import 및 device설정 (GPU사용)
1
2
3
4
5
6
7
8
9
10
11
12
13
import numpy as np
import matplotlib.pyplot as plt
import torch
import torch.nn as nn
import torch.optim as optim
import torch.nn.functional as F
%matplotlib inline
%config InlineBackend.figure_format='retina'

print ("PyTorch version:[%s]."%(torch.__version__))
# gpu 설정
device = torch.device('cuda:0' if torch.cuda.is_available() else 'cpu')
print ("device:[%s]."%(device))

- MNIST 데이터 읽어오기
학습용 데이터셋, 테스트용 데이터셋을 가져오고 transform옵션을 사용해 이미지를 pytorch에서 사용하는 형태로 변경해서 받아옴
1
2
3
4
5
6
from torchvision import datasets,transforms
mnist_train = datasets.MNIST(root='./data/',train=True,transform=transforms.ToTensor(),download=True)
mnist_test = datasets.MNIST(root='./data/',train=False,transform=transforms.ToTensor(),download=True)
print ("mnist_train:\n",mnist_train,"\n")
print ("mnist_test:\n",mnist_test,"\n")
print ("Done.")
- dataloader 설정
Data-loader생성, shuffle를 True로하여 배치 선택마다 섞도록 한다.
1
2
3
4
BATCH_SIZE = 256
train_iter = torch.utils.data.DataLoader(mnist_train,batch_size=BATCH_SIZE,shuffle=True,num_workers=1)
test_iter = torch.utils.data.DataLoader(mnist_test,batch_size=BATCH_SIZE,shuffle=True,num_workers=1)
print ("Done.")
- model class 정의
첫번째 layer의 입력은 xdim 출력은 hdim, 두번째 layer의 입력은 hdim, 출력은 ydim이기 때문에
nn.Linear(xdim, hdim), nn.Linear(hdim,ydim)
1
2
3
4
5
6
7
8
9
10
11
12
13
14
15
16
17
18
19
20
21
22
23
24
25
26
27
28
29
30
31
class MultiLayerPerceptronClass(nn.Module):
    """
        Multilayer Perceptron (MLP) Class
    """
    def __init__(self,name='mlp',xdim=784,hdim=256,ydim=10):
        super(MultiLayerPerceptronClass,self).__init__()
        self.name = name
        self.xdim = xdim
        self.hdim = hdim
        self.ydim = ydim
        self.lin_1 = nn.Linear(xdim, hdim)
        self.lin_2 = nn.Linear(hdim, ydim)
        self.init_param() # initialize parameters

    def init_param(self):
        nn.init.kaiming_normal_(self.lin_1.weight)
        nn.init.zeros_(self.lin_1.bias)
        nn.init.kaiming_normal_(self.lin_2.weight)
        nn.init.zeros_(self.lin_2.bias)

    def forward(self,x):
        net = x
        net = self.lin_1(net)
        net = F.relu(net)
        net = self.lin_2(net)
        return net

M = MultiLayerPerceptronClass(name='mlp',xdim=784,hdim=256,ydim=10).to(device)
loss = nn.CrossEntropyLoss()
optm = optim.Adam(M.parameters(),lr=1e-3)
print ("Done.")
- eval 함수 작성
1
2
3
4
5
6
7
8
9
10
11
12
13
14
15
16
def func_eval(model,data_iter,device):
    with torch.no_grad(): # 테스트용 함수이기 때문에 Gradient계산 안하도록
        model.eval() # evaluate (affects DropOut and BN)
        n_total,n_correct = 0,0
        for batch_in,batch_out in data_iter: # DataLoader에서 x,y값 가져오기
            y_trgt = batch_out.to(device)
            model_pred = model(batch_in.view(-1,28*28).to(device)) # 모델의 예측결과 저장
						# 첫번째 W가 (28*28, 256) matrix이므로 입력값의 shape를 맞춰줌
            _,y_pred = torch.max(model_pred.data,1)
            n_correct += (y_pred == y_trgt).sum().item()
						# 예측값과 실제 label이 같은경우의 개수를 셈
            n_total += batch_in.size(0)
        val_accr = (n_correct/n_total)
        model.train() # back to train mode
    return val_accr
print ("Done")
- 학습코드 작성
1
2
3
4
5
6
7
8
9
10
11
12
13
14
15
16
17
18
19
20
21
22
M.init_param() # initialize parameters
M.train()
EPOCHS,print_every = 10,1
for epoch in range(EPOCHS):
    loss_val_sum = 0
    for batch_in,batch_out in train_iter:
        # Forward path
        y_pred = M.forward(batch_in.view(-1, 28*28).to(device))
        loss_out = loss(y_pred,batch_out.to(device))
        # Update
        optm.zero_grad()  # reset gradient
        loss_out.backward()   # backpropagate
        optm.step()      # optimizer update
        loss_val_sum += loss_out
    loss_val_avg = loss_val_sum/len(train_iter)
    # Print
    if ((epoch%print_every)==0) or (epoch==(EPOCHS-1)):
        train_accr = func_eval(M,train_iter,device)
        test_accr = func_eval(M,test_iter,device)
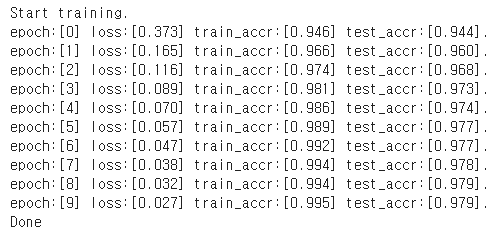
        print ("epoch:[%d] loss:[%.3f] train_accr:[%.3f] test_accr:[%.3f]."%
               (epoch,loss_val_avg,train_accr,test_accr))

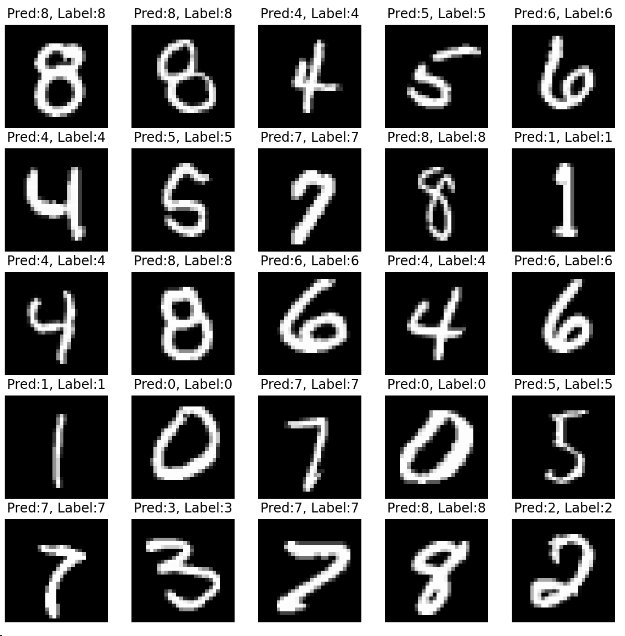
- 결과보기
1
2
3
4
5
6
7
8
9
10
11
12
13
14
15
n_sample = 25
sample_indices = np.random.choice(len(mnist_test.targets), n_sample, replace=False)
test_x = mnist_test.data[sample_indices]
test_y = mnist_test.targets[sample_indices]
with torch.no_grad():
    y_pred = M.forward(test_x.view(-1, 28*28).type(torch.float).to(device)/255.)
y_pred = y_pred.argmax(axis=1)
plt.figure(figsize=(10,10))
for idx in range(n_sample):
    plt.subplot(5, 5, idx+1)
    plt.imshow(test_x[idx], cmap='gray')
    plt.axis('off')
    plt.title("Pred:%d, Label:%d"%(y_pred[idx],test_y[idx]))
plt.show()
print ("Done")

Dataset 다루기
dataset
torch.utils.data.Dataset을 상속받아 클래스로 만들어 사용한다.
1
2
3
4
5
6
7
8
9
10
11
12
13
14
15
16
17
import torch
import torch.nn.functional as F
import numpy as np
from torch.utils.data import Dataset, DataLoader

class MyDataset(Dataset):
    def __init__(self, x_data, y_data):
        self.x_data = x_data
        self.y_data = y_data

    def __len__(self):
        return len(self.y_data)

    def __getitem__(self, idx): # 반환은 항상 Tensor로 해줘야함
        x = torch.FlostTensort(self.x_data[idx])
        y = torch.FlostTensort(self.y_data[idx])
        return x,y
dataloader
dataset을 만든 뒤 DataLoader를 사용해 데이터를 읽어오는 iterator를 만들 수 있다.
1
2
3
dataset = MyDataset(data_x, data_y)

dataloader = DataLoader(dataset, batch_size = 2, shuffle = True)
dataloader는 X, Y데이터를 반환하므로(__getitem__함수) 아래와 같이 사용할 수 있다.
1
2
for batch_in, batch_out in dataloader:
	...
image to tensor
Python에서 image를 다르는 PIL을 사용해 이미지를 읽어올 수 있다.
1
2
3
4
5
from PIL import Image
import numpy as np

img = Image.open("out1.png")
img
오픈하려는 이미지의 절대 경로를 작성해야 하므로 위와 같이 작성하면 현재 파이썬 파일과 같은 디렉토리에 이미지가 있어야한다.
현재 dir확인, 경로 만들기
1
2
3
4
5
import os

os.getcwd() # 현재 dir을 확인가능
PATH = os.path.join("content","drive","out1.png") # PATH만들기
img = Image.open(PATH)
image to array
PLT의 getdata를 사용해 ndarray타입으로 변환할 수 있다.
1
np_img_array = np.array(img.getdata())
pytorch에서는 transforms을 사용해 이미지를 Tensor로 변환할 수 있다.
1
2
3
from torchvision import transforms

image_tensor = transforms.ToTensor()(img)